This project is actively being developed.
The implementation currently covers:
- provisioning infrastructure with Terraform
- early automation of Linux From Scratch build stages
Future updates will expand into cross-toolchain automation, chroot builds, and bootable system generation.
Automating Linux from Scratch with Ansible and Terraform
Published Apr 06, 2026 • 18 min read

Table of Contents
- 1. Introduction
- 2. Why Automate Linux From Scratch
- 3. Architecture Overview
- 4. Phase 1: Provisioning Infrastructure with Terraform
- Infrastructure Flow
- Installing Terraform & Setting Up Environment
- Configuring Terraform Resources
- Provisioning Terraform Infrastructure
- 5. Phase 2: Configuring Ansible & LFS Prerequisites
Introduction
This guide documents an ongoing project focused on automating the most recent (LFS v13.0-systemd as of this writing) Linux From Scratch build process using Libvirt, Cloud-Init, Terraform, and Ansible. The primary objective is to create a fully reproducible virtual environment where an LFS system can be automatically built in clearly defined stages.
Rather than manually repeating the lengthy LFS workflow each time, this project uses infrastructure-as-code and configuration management principles to automate the process while preserving the educational value of the original LFS methodology.
The stack is intentionally divided into clear responsibilities:
- Libvirt is the underlying virtualization software
- Cloud-Init performs first-boot guest initialization
- Terraform provisions infrastructure deterministically
- Ansible manages system configuration and LFS build stages
This separation of duties keeps infrastructure provisioning independent from operating system configuration and allows for automated control of the build process. If you already have the underlying infrastructure configured you can skip the provisioning step and go right into Ansible for building LFS on the existing system.
The long-term goal is to make every major LFS phase restartable so users can rebuild, test, and experiment without repeating the full workflow.
Why Automate Linux From Scratch
Linux From Scratch is fundamentally a learning project designed to teach how a Linux system is assembled from source code. This project extends that philosophy by introducing modern DevOps and systems engineering tooling into the workflow.
Repeatable Virtual Machine provisioning and deterministic infrastructure builds allow for consistent infrastructure across builds. Configuration management performs the system build in stages, allowing users to take over at certain parts of the build process, or revert back to certain stages. Setup time is reduced, allowing users to spend more time on the important pieces of the Linux from Scratch build process.
One of the biggest advantages is the ability to resume from specific phases of the LFS build rather than restarting from the beginning. This is particularly valuable when testing package build steps, troubleshooting toolchain issues, or experimenting with different system configurations.
Architecture Overview
Before diving into the Phase 1, it is useful to get a high level understanding of how the system is designed end-to-end.
This project follows a staged automation pipeline:
- Terraform provisions the virtual infrastructure
- Cloud-Init prepares the guest OS during first boot
- Ansible configures prerequisites and storage
- Ansible builds the LFS cross-toolchain
- Ansible builds temporary tools
- Ansible enters chroot and builds the final system
This staged design mirrors the official LFS workflow while making each phase reproducible and independently testable.
Component Responsibilities
Terraform
Terraform is responsible for infrastructure provisioning only. See Provisioning Infrastructure with Terraform for a visual representation of how infrastructure is provisioned via Terraform.
The steps performed by Terraform are as follows:
- Creating a new storage pool to isolate infrastructure and allow full control over resources.
- Downloading or specifying path to the linux base image, then creating an overlay image based on the base image.
- Creating an empty LFS disk for the target VM to isolate LFS environment.
- Creating the Cloud-Init disk and injecting the user-data file for post-boot.
- Provisioning the LFS VM with all previously created disks attached.
Terraform’s job ends once the virtual machine is online.
Cloud-Init
Cloud-Init bridges infrastructure and configuration by passing data to the target virtual machine to be consumed by Ansible.
It prepares the VM on first boot by:
- Creating the Ansible user and adding the public SSH key to authorized keys.
- Performing a software upgrade post-boot to ensure latest packages are installed.
- Exposing LFS disk metadata to be consumed by Ansible.
These steps allow Ansible to connect immediately after provisioning and find the LFS disk to format.
Ansible
Ansible performs the LFS build in stages with a focus on idempotency, following the steps from the official Linux from Scratch guide.
The logic is separated into the following stages:
- The prerequisites stage includes LFS disk formatting and mounting, LFS user and environment setup, package upgrade and system check.
- The toolchain stage includes setting up file hierarchy, downloading archived system files, and compiling the cross-toolchain
- The temptools stage utilizes the cross-toolchain built in the previous stage to cross-compile basic utilities.
- The software stage installs basic system software that users (or the system) may need.
- The config stage configures services such as systemd and general networking.
- The boot stage goes over building a Linux kernel for the LFS system and installing the GRUB bootloader to turn LFS into a bootable system.
This design keeps each tool focused on its intended responsibility. I would like to say again, I highly recommend at least reading through the Linux from Scratch online book, as it provides many kernels of knowledge not provided in this post.
Phase 1: Provisioning Infrastructure with Terraform
With the architecture established, the first implementation phase focuses on infrastructure provisioning. The primary goal is to create an isolated, reproducible environment for Linux From Scratch that can be rebuilt quickly and consistently.
This project has been tested using the Rocky Linux Generic Cloud image as the base operating system. This section assumes the host operating system is Fedora-based and user has escalated privileges. If using another OS (i.e. Ubuntu), you can follow the steps to install Terraform here.
Infrastructure Flow
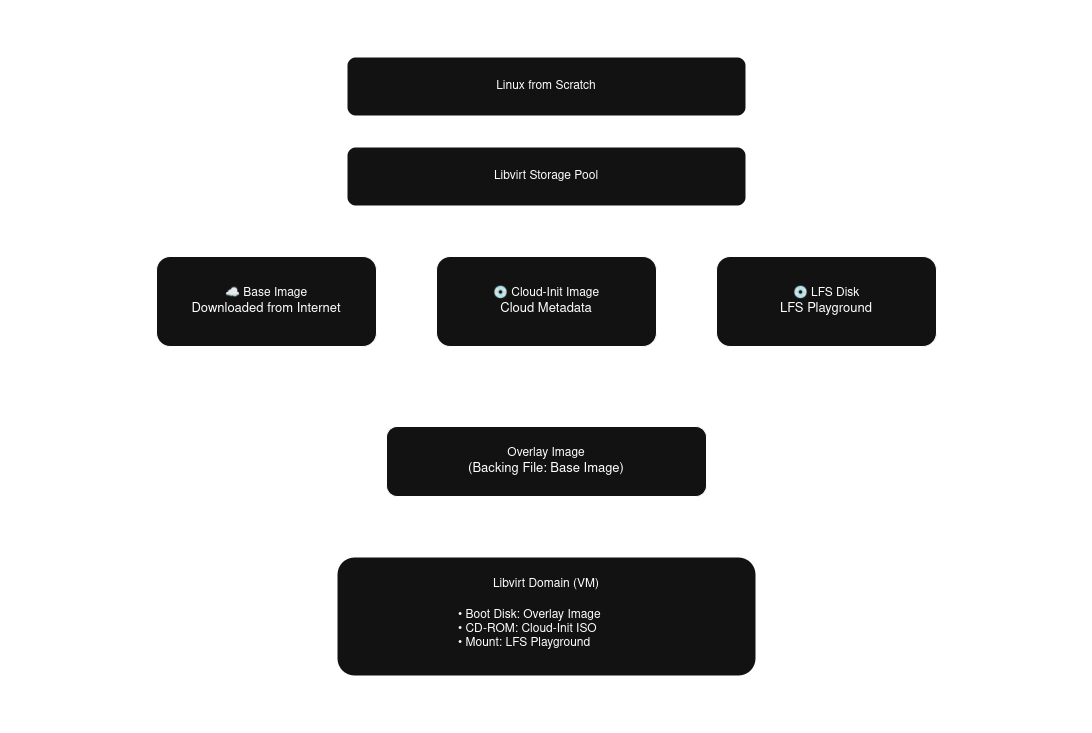
Fig. 1: Linux from Scratch Terraform resources dependency flowchart.
The infrastructure dependency chain follows this order:
- storage pool
- base cloud image
- overlay image
- dedicated LFS disk
- cloud-init disk
- virtual machine domain
This dependency graph is intentionally modeled in Terraform so resource creation remains deterministic. The storage pool must exist before any volumes are created. The overlay disk depends on the downloaded base image and stores only filesystem changes, allowing fast rebuilds and minimal storage overhead. The dedicated LFS disk is isolated from the operating system disk so the build workspace can be preserved or replaced independently. This is especially useful during iterative testing.
Installing Terraform & Setting Up Environment
Add the hashicorp repo and install Terraform.
sudo dnf install -y dnf-utils
...
Complete!
sudo yum-config-manager --add-repo https://rpm.releases.hashicorp.com/RHEL/hashicorp.repo
Adding repo from: https://rpm.releases.hashicorp.com/RHEL/hashicorp.repo
sudo dnf install -y terraform
...
Complete!
Install Virtualization packages and enable the libvirt daemon.
sudo dnf install -y qemu-kvm libvirt virt-install
...
Complete!
sudo systemctl enable --now libvirtd
Created symlink /etc/systemd/system/multi-user.target.wants/libvirtd.service → /usr/lib/systemd/system/libvirtd.service.
Created symlink /etc/systemd/system/sockets.target.wants/libvirtd.socket → /usr/lib/systemd/system/libvirtd.socket.
Created symlink /etc/systemd/system/sockets.target.wants/libvirtd-ro.socket → /usr/lib/systemd/system/libvirtd-ro.socket.
Created symlink /etc/systemd/system/sockets.target.wants/libvirtd-admin.socket → /usr/lib/systemd/system/libvirtd-admin.socket.
Generate SSH keys for the Ansible user. SSH keys will be used to grant Ansible passwordless access.
ssh-keygen -t ed25519 -C ansible -f ~/.ssh/linux-from-scratch -N ''
Generating public/private rsa key pair.
Your identification has been saved in /admin/.ssh/linux-from-scratch
Your public key has been saved in /admin/.ssh/linux-from-scratch.pub
...
Create Terraform files and configuration structure.
mkdir --parents ~/terraform/linux-from-scratch
touch ~/terraform/linux-from-scratch/{main,variables}.tf
touch ~/terraform/linux-from-scratch/terraform.tfvars
touch ~/terraform/linux-from-scratch/user-data.yml
Configuring Terraform Resources
Edit the variables.tf file, adding the following variables. The default values for VM resources (i.e. cpu, memory) are the recommended sizes based on the LFS Host System Hardware Requirements.
variable "libvirt_uri" {
  description = "Specifies connection to libvirt driver, defaults to local system."
  type        = string
  default     = "qemu:///system"
}

variable "pool_name" {
  description = "Name of libvirt storage pool to create for managing volumes."
  type        = string
  default     = "linux-from-scratch"
}

variable "pool_path" {
  description = "The storage pool path where the directory will be created."
  type        = string
  default     = "/var/lib/libvirt/images"
}

variable "ssh_public_key" {
  description = "SSH public key for passwordless connection to host post boot."
  type        = string
  default     = null
}

variable "base_image_name" {
  type       = string
  default    = "base"
}

variable "base_image" {
  description = "Location of image to base overlay image on, supports downloading via URL."
  type       = string
  default    = null
}

variable "overlay_image_name" {
  type       = string
  default    = "overlay"
}

variable "overlay_image_size" {
  description = "Size of overlay image (GiB)"
  type        = number
  default     = 20
}

variable "lfs_disk_name" {
  type        = string
  default     = "lfs"
}

variable "lfs_disk_size" {
  description = "Size of lfs disk (GiB)"
  type        = number
  default     = 30
}

variable "vm_name" {
  type        = string
  default     = "linux-from-scratch"
}

variable "vm_memory" {
  description = "Size of vm memory (GiB)"
  type        = number
  default     = 8
}

variable "vm_vcpu" {
  description = "Number of CPU cores"
  type        = number
  default     = 4
}

variable "vm_use_uefi" {
  description = "Boot via UEFI or BIOS, defaults to UEFI"
  type        = bool
  default     = true
}
Edit the terraform.tfvars file. Update the following variables based on how you would like your system configured, the ssh public key generated in the previous section (if you ran the provided ssh-keygen command you can view the key with this command cat ~/.ssh/linux-from-scratch.pub).
pool_name          = "linux-from-scratch"
base_image         = "https://dl.rockylinux.org/pub/rocky/10/images/x86_64/Rocky-10-GenericCloud-Base-10.1-20251116.0.x86_64.qcow2"
base_image_name    = "rocky10-base"
overlay_image_name = "rocky10-overlay"
ssh_public_key     = # Generated ssh public key
Edit the main.tf file with your preferred text editor. Libvirt provider dmacvicar/libvirt version 0.9.4 introduces many changes to previous versions. This version more closely maps to the xml data Libvirt uses to read and display data. The uri is set to be a variable for users who wish to change the uri connection to the hypervisor.
#############################################################
# PROVIDERS
#############################################################

terraform {
  required_providers {
    libvirt = {
      source = "dmacvicar/libvirt"
      version = "0.9.4"
    }
  }
}

provider "libvirt" {
  uri = var.libvirt_uri
}
To simplify resource definitions later in the configuration, a locals block is used to derive reusable values.
#############################################################
# LOCALS
#############################################################

locals {
  pool_path = "${var.pool_path}/${var.pool_name}"
  gb = 1024 * 1024 * 1024
}
Add storage resources. The overlay volume references the base image in the backing_image section referencing the base disk by id (this ensures the overlay disk will not be generated until the base image has been created).
#############################################################
# STORAGE POOL
#############################################################

resource "libvirt_pool" "lfs" {
  name   = var.pool_name
  type   = "dir"
  target = {
    path = local.pool_path
  }

  create = {
    build     = true
    start     = true
    autostart = true
  }
}

#############################################################
# OS DISK (BASE)
#############################################################

resource "libvirt_volume" "lfs_base" {
  name   = "${var.base_image_name}.qcow2"
  pool   = libvirt_pool.lfs.name
  target = {
    format = {
      type = "qcow2"
    }
  }

  create = {
    content = {
      url = var.base_image
    }
  }
}

#############################################################
# OS DISK (OVERLAY)
#############################################################

resource "libvirt_volume" "lfs_overlay" {
  name     = "${var.overlay_image_name}.qcow2"
  pool     = libvirt_pool.lfs.name
  capacity = var.overlay_image_size * local.gb
  target = {
    format = {
      type = "qcow2"
    }
  }

  backing_store = {
    path   = libvirt_volume.lfs_base.id
    format = {
      type = "qcow2"
    }
  }
}

#############################################################
# LFS DISK (LFS)
#############################################################

resource "libvirt_volume" "lfs" {
  name     = "${var.lfs_disk_name}.qcow2"
  pool     = libvirt_pool.lfs.name
  capacity = var.lfs_disk_size * local.gb
  target = {
    format = {
      type = "qcow2"
    }
  }
}
Add the Cloud-Init image and inject the variables into the user data file. SSH keys are passed and added to the Ansible user's trusted keys, and the LFS disk id is added to the facts dir for Ansible to gather later. The choice to hash the LFS key was used because device id's are limited to 20 characters. The key generated from the libvirt provider utilizes the disk path as the volume keys, meaning long paths could lead to duplicated id's. The solution is to provide a unique hash as the id that Ansible can then use to locate the device on the target system.
#############################################################
# CLOUD INIT
#############################################################

resource "libvirt_cloudinit_disk" "lfs_init" {
  name = "${var.vm_name}-init"

  user_data = templatefile("${path.module}/user-data.yml", {
    ssh_key = var.ssh_public_key
    lfs_disk = substr(sha256(libvirt_volume.lfs.key), 1, 20)
  })

  meta_data = yamlencode({
    instance-id    = var.vm_name
    local-hostname = var.vm_name
  })
}
The Libvirt domain below allows for limited user modification, including firmware. When booting via BIOS, if the domain does not have a video device attached it will wait indefinitely during Power-On Self-Test (POST) for the video device. The libvirt volumes are provided as a list of disks and referenced by id, this ensures that Terraform waits for the volumes to be created prior to provisioning the domain.
#############################################################
# VM
#############################################################

resource "libvirt_domain" "lfs_vm" {
  name        = var.vm_name
  memory      = var.vm_memory
  memory_unit = "GiB"
  vcpu        = var.vm_vcpu

  type      = "kvm"
  autostart = true
  running   = true

  os = {
    type         = "hvm"
    type_machine = "q35"
    firmware     = var.vm_use_uefi ? "efi" : null
    boot         = [{ dev = "hd" }]
  }

  cpu = {
    mode = "host-passthrough"
  }

  features = {
    acpi = true
  }

  devices = {
    disks = [
      {
        source = {
          file = {
            file = libvirt_volume.lfs_overlay.id
          }
        }
        target = {
          dev = "vda"
          bus = "virtio"
        }
        driver = {
          type = "qcow2"
        }
      },
      {
        source = {
          file = {
            file = libvirt_volume.lfs.id
          }
        }
        target = {
          dev = "vdb"
          bus = "virtio"
        }
        driver = {
          type = "qcow2"
        }
        serial = substr(sha256(libvirt_volume.lfs.key), 1, 20)
      },
      {
        source = {
          file = {
            file = libvirt_cloudinit_disk.lfs_init.path
          }
        }
        target = {
          dev = "sda"
          bus = "sata"
        }
        device   = "cdrom"
        readonly = true
      }
    ]

    interfaces = [
      {
        model = {
          type = "virtio"
        }
        source = {
          network = {
            network = "default"
          }
        }
      }
    ]

    serials = [
      {
        type = "pty"
        target_port = "0"
      }
    ]

    videos = var.vm_use_uefi == false ? [
      {
        model = {
          type    = "virtio"
          heads   = 1
          primary = "yes"
        }
      }
    ] : []
  }
}
Edit the user-data.yml. Cloud-Init provides many configuration options that can be applied after the first boot of the domain (see examples here). The goal is to minimize tasks in Cloud-Init since Ansible will be managing the VM configuration. The Ansible user is created at this stage, and the public ssh key is included in its authorized keys list. The LFS disk id is passed to the Ansible facts directory and will be accessible to Ansible automatically, allowing Ansible to find the correct device to format and mount for the LFS playground.
#cloud-config

ssh_pwauth: false
disable_root: true

package_update: true
package_upgrade: true

users:
  - name: ansible
    groups: wheel
    sudo: ALL=(ALL) NOPASSWD:ALL
    shell: /bin/bash
    ssh_authorized_keys:
      - ${ssh_key}

write_files:
  - path: /etc/ansible/facts.d/bootstrap.fact
    permissions: '0644'
    content: |
      {
        "lfs_disk": "${lfs_disk}"
      }
Provisioning Terraform Infrastructure
Now that the infrastructure has been defined, proceed with provisioning the resources. Initialize the Terraform project to install the required plugins, then generate and apply a plan file.
terraform init
Initializing the backend...
Initializing provider plugins...
...
terraform plan -out tfplan

Terraform used the selected providers to generate the following execution plan. Resource actions are indicated with
the following symbols:
  + create
...
terraform apply tfplan
libvirt_pool.lfs: Creating...
...
Phase 2: Configuring Ansible & LFS Prerequisites
Once the infrastructure has been provisioned we can start on the meat of this article, configuring Ansible to manage the LFS system with multiple build stages in an idempotent manner. This section covers installing and setting up Ansible, initializing the LFS role and setting up tasks for the prerequisites stage.
The Ansible LFS role prerequisites stage goes over the following tasks:
- Formatting and mounting the LFS disk device by id.
- Installing required packages and running the LFS verification script to ensure system is ready.
- Copying the LFS profile script to ensure all users have access to the
$LFSenvironment variable. - Creating the LFS user and group.
Installing Ansible & Setting Up Environment
The goal of this phase is to establish a baseline that will support the remaining chapters of the project. The role-based layout attempts to mirror the chapter-driven nature of Linux From Scratch, making it easier to map automation tasks back to the official LFS workflow.
This allows users to:
- rerun failed stages
- pause at specific chapters
- test individual toolchain steps
- continue builds incrementally
This design closely aligns with the iterative and educational nature of Linux From Scratch.
The first step is to install Ansible on the host system where Terraform was executed. This host will act as the control node responsible for orchestrating the LFS virtual machine over SSH.
sudo dnf install -y epel-release
...
Complete!
sudo dnf install -y ansible
...
Complete!
The inventory file defines the target systems Ansible will manage. Because the IP address is assigned dynamically by DHCP during provisioning, use virsh to ouput the assigned ip address and append the host address and private SSH key to the inventory file.
virsh domifaddr linux-from-scratch
 Name       MAC address          Protocol     Address
-------------------------------------------------------------------------------
 vnet2      52:54:00:13:3e:0d    ipv4         192.168.124.7/24
echo -e "[linux-from-scratch]\n192.168.124.7 ansible_ssh_private_key_file=~/.ssh/linux-from-scratch" >> /etc/ansible/hosts
Using Ansible’s built-in role structure keeps the project modular and makes it easier to separate responsibilities. This structure becomes increasingly valuable as the project grows across multiple LFS chapters. Initialize the LFS role and create the LFS playbook.
ansible-galaxy init /etc/ansible/roles/linux-from-scratch
- Role /etc/ansible/linux-from-scratch was created successfully
touch /etc/ansible/lfs.yml
Ansible playbooks are used to map hosts to roles and tasks. Create a Edit the lfs.yml playbook file with the following text.
---

- name: Linux from Scratch Playbook
  hosts: linux-from-scratch
  remote_user: ansible
  become: true
  roles:
    - role: linux-from-scratch
Once the Ansible environment is in place, the next section focuses on preparing the dedicated LFS disk and configuring the target system for the initial build chapters.
Configuring LFS Prerequisite Tasks
The target system must be prepared to match the expectations of the Linux From Scratch workflow. This prerequisite phase is responsible for establishing the foundational system state required by the early LFS chapters.
Rather than placing all tasks into a single playbook file, the prerequisites are intentionally broken into a staged task structure under the 00_prerequisites directory. This keeps the automation aligned with the order in which the LFS book introduces system preparation and makes troubleshooting significantly easier.
mkdir /etc/ansible/roles/linux-from-scratch/tasks/00_prerequisites
touch /etc/ansible/roles/linux-from-scratch/tasks/00_prerequisites/{01_filesystems,02_software,03_environment,04_user}.yml
Preparing the LFS Filesystem
The first prerequisite task focuses on preparing the dedicated LFS disk that was provisioned earlier by Terraform. At this stage, Ansible is responsible for detecting the correct block device, creating the required partition layout, formatting the filesystem, and mounting it at the expected LFS mount point. By automating partitioning and mounting here, the build environment becomes fully reproducible across rebuilds and test iterations.
Ansible defaults are variables that can be utilized within the tasks of a role. Add the root LFS path to the defaults/main.yml file.
lfs_root_path: "/mnt/linux-from-scratch"
Edit the tasks/00_prerequisites/01_filesystems.yml file with the following tasks to automatically find, partition and mount the LFS filesystem and swap partition.
---

- name: gather LFS disk by id via Ansible bootstrap
  ansible.builtin.find:
    paths: /dev/disk/by-id
    patterns: "*{{ ansible_local.bootstrap.lfs_disk }}"
    file_type: "link"
  register: lfs_disk_bootstrap

- name: fail when list of LFS disks length does not equal 1
  ansible.builtin.fail:
    msg: "expected exactly one disk, found {{ lfs_disk_bootstrap.matched }}"
  when: lfs_disk_bootstrap.matched != 1

- name: store LFS disk path to a variable
  ansible.builtin.set_fact:
    lfs_disk: "{{ lfs_disk_bootstrap.files[0].path }}"

- name: ensure mountpoint exists for LFS disk
  ansible.builtin.file:
    path: "{{ lfs_root_path }}"
    state: directory
    owner: root
    group: root
    mode: "0755"

- name: ensure LFS partition exists
  community.general.parted:
    device: "{{ lfs_disk }}"
    label: gpt
    name: linux-from-scratch
    number: 1
    part_start: 1MiB
    part_end: 28GiB
    state: present

- name: ensure LFS partition is formatted
  community.general.filesystem:
    fstype: ext4
    dev: "/dev/disk/by-partlabel/linux-from-scratch"

- name: ensure LFS partition is mounted
  ansible.posix.mount:
    src: PARTLABEL=linux-from-scratch
    path: "{{ lfs_root_path }}"
    fstype: ext4
    opts: defaults,noatime
    passno: 2
    state: mounted

- name: ensure swap partition exists
  community.general.parted:
    device: "{{ lfs_disk }}"
    label: gpt
    name: swap
    flags: [ swap ]
    number: 2
    part_start: 28GiB
    part_end: 100%
    state: present

- name: ensure swap partition is formatted
  community.general.filesystem:
    fstype: swap
    dev: "/dev/disk/by-partlabel/swap"

- name: ensure swap partition is mounted
  ansible.posix.mount:
    src: PARTLABEL=swap
    path: none
    fstype: swap
    opts: sw
    state: present

- name: ensure swap is active
  ansible.builtin.command: swapon -a
  changed_when: false
Installing Required Host Software
Once the filesystem layout is in place, the next step is ensuring the target system satisfies the software requirements expected for building Linux From Scratch. This task file is responsible for enabling any required package repositories, installing required software on the host system, and validating that the host system is suitable for continuing into the toolchain build stages.
In this project, this includes:
- Ensuring required package repos are added and enabled on the host system.
- Installing build dependencies and development tools via package manager.
- Ensuring compatibility symlinks required for the LFS build are present.
- Running the official LFS host validation script to ensure the host system is set up properly.
The validation script is particularly helpful because it provides an early checkpoint that confirms the environment meets the minimum requirements defined by the LFS documentation. Generate the files/version-check.sh file and add the following script.
#!/bin/bash
# A script to list version numbers of critical development tools

# If you have tools installed in other directories, adjust PATH here AND
# in ~lfs/.bashrc (section 4.4) as well.

LC_ALL=C
PATH=/usr/bin:/bin

bail() { echo "FATAL: $1"; exit 1; }
grep --version > /dev/null 2> /dev/null || bail "grep does not work"
sed '' /dev/null || bail "sed does not work"
sort   /dev/null || bail "sort does not work"

ver_check()
{
   if ! type -p $2 &>/dev/null
   then
     echo "ERROR: Cannot find $2 ($1)"; return 1;
   fi
   v=$($2 --version 2>&1 | grep -E -o '[0-9]+\.[0-9\.]+[a-z]*' | head -n1)
   if printf '%s\n' $3 $v | sort --version-sort --check &>/dev/null
   then
     printf "OK:    %-9s %-6s >= $3\n" "$1" "$v"; return 0;
   else
     printf "ERROR: %-9s is TOO OLD ($3 or later required)\n" "$1";
     return 1;
   fi
}

ver_kernel()
{
   kver=$(uname -r | grep -E -o '^[0-9\.]+')
   if printf '%s\n' $1 $kver | sort --version-sort --check &>/dev/null
   then
     printf "OK:    Linux Kernel $kver >= $1\n"; return 0;
   else
     printf "ERROR: Linux Kernel ($kver) is TOO OLD ($1 or later required)\n" "$kver";
     return 1;
   fi
}

# Coreutils first because --version-sort needs Coreutils >= 7.0
ver_check Coreutils      sort     8.1 || bail "Coreutils too old, stop"
ver_check Bash           bash     3.2
ver_check Binutils       ld       2.13.1
ver_check Bison          bison    2.7
ver_check Diffutils      diff     2.8.1
ver_check Findutils      find     4.2.31
ver_check Gawk           gawk     4.0.1
ver_check GCC            gcc      5.4
ver_check "GCC (C++)"    g++      5.4
ver_check Grep           grep     2.5.1a
ver_check Gzip           gzip     1.3.12
ver_check M4             m4       1.4.10
ver_check Make           make     4.0
ver_check Patch          patch    2.5.4
ver_check Perl           perl     5.8.8
ver_check Python         python3  3.4
ver_check Sed            sed      4.1.5
ver_check Tar            tar      1.22
ver_check Texinfo        texi2any 5.0
ver_check Xz             xz       5.0.0
ver_kernel 5.4

if mount | grep -q 'devpts on /dev/pts' && [ -e /dev/ptmx ]
then echo "OK:    Linux Kernel supports UNIX 98 PTY";
else echo "ERROR: Linux Kernel does NOT support UNIX 98 PTY"; fi

alias_check() {
   if $1 --version 2>&1 | grep -qi $2
   then printf "OK:    %-4s is $2\n" "$1";
   else printf "ERROR: %-4s is NOT $2\n" "$1"; fi
}
echo "Aliases:"
alias_check awk GNU
alias_check yacc Bison
alias_check sh Bash

echo "Compiler check:"
if printf "int main(){}" | g++ -x c++ -
then echo "OK:    g++ works";
else echo "ERROR: g++ does NOT work"; fi
rm -f a.out

if [ "$(nproc)" = "" ]; then
   echo "ERROR: nproc is not available or it produces empty output"
else
   echo "OK: nproc reports $(nproc) logical cores are available"
fi
Add the repos, packages and expected symlinks to the defaults/main.yml file.
lfs_host_repos:
  - name: crb
    description: crb repo
    url: https://dl.rockylinux.org/pub/rocky/$releasever/CRB/$basearch/os
    enabled: true
    gpgkey: https://dl.rockylinux.org/pub/rocky/$releasever/CRB/$basearch/os/RPM-GPG-KEY-Rocky-$releasever

lfs_host_packages:
  - bash
  - binutils
  - bison
  - coreutils
  - diffutils
  - findutils
  - gawk
  - gcc
  - grep
  - gzip
  - kernel-headers
  - kernel-devel
  - m4
  - make
  - patch
  - perl
  - python
  - sed
  - tar
  - texinfo
  - xz

lfs_host_symlinks:
  - src: /usr/bin/gawk
    dest: /usr/bin/awk
  - src: /usr/bin/bash
    dest: /usr/bin/sh
  - src: /usr/bin/bison
    dest: /usr/bin/yacc
Edit the tasks/00_prerequisites/02_software.yml file with the following tasks to add repos, software packages and copying / executing version-check.sh script on the remote machine. On error, the script will fail and provide output regarding the source of the error.
---

- name: ensure required repos are present
  ansible.builtin.yum_repository:
    name: "{{ repo.name }}"
    description: "{{ repo.description }}"
    baseurl: "{{ repo.url }}"
    enabled: "{{ repo.enabled }}"
    gpgcheck: true
    gpgkey: "{{ repo.gpgkey }}"
    state: present
  loop: "{{ lfs_host_repos }}"
  loop_control:
    loop_var: repo

- name: ensure required software packages are installed
  ansible.builtin.dnf:
    name: "{{ package }}"
  loop: "{{ lfs_host_packages }}"
  loop_control:
    loop_var: package
    label: "package: {{ package }}"

- name: ensure symlinks exist for required software
  ansible.builtin.file:
    src: "{{ symlink.src }}"
    dest: "{{ symlink.dest }}"
    owner: root
    group: root
    state: link
  loop: "{{ lfs_host_symlinks }}"
  loop_control:
    loop_var: symlink

- name: perform version compatability check on software
  ansible.builtin.script: version-check.sh
  register: output

- name: ensure system software passes all required tests
  ansible.builtin.debug:
    var: output.stdout_lines
  failed_when: "'ERROR' in output.stdout"
Configuring the Build Environment
To ensure the LFS root path is available across sessions and remains persistent after reboots, create a script that exports the LFS environment variable and place it under /etc/profile.d. This approach allows the environment to be loaded automatically for all future login sessions and keeps the configuration centralized and accessible to all users.
---

- name: ensure LFS environment variable is available on login
  ansible.builtin.lineinfile:
    path: /etc/profile.d/linux-from-scratch.sh
    line: "export LFS={{ lfs_root_path }}"
    state: present
    create: true
    mode: '0644'
Creating the LFS Build User
The final prerequisite step is creating the dedicated LFS user. This mirrors the official Linux From Scratch process, where the temporary toolchain is built under a non-root user account to reduce the risk of contaminating the host system.
---

- name: ensure lfs group exists
  ansible.builtin.group:
    name: lfs
    state: present

- name: ensure lfs user exists
  ansible.builtin.user:
    name: lfs
    shell: /bin/bash
    groups: lfs
    create_home: yes
    skeleton: /dev/null
The next phase will be setting up the LFS system file hierarchy, installing software archives, and building the cross-toolchain.